
Previously, we covered how to disable SELinux or set it to permissive mode in Fedora, RHEL, and CentOS to troubleshoot and circumvent permissions-related issues. But what after disabling it or setting it in permissive mode, we want to set it back to the default enforcing mode?
The Reality of SELinux for Power Users and Desktop Workstations
While SELinux provides powerful mandatory access control that is invaluable for hardened multi-tenant enterprise servers, it can become an absolute nightmare for power-users, developers, and desktop environments. Handling complex workloads, custom compilation paths, large local screenshot assets, web servers, and containerized tools frequently triggers unexpected permission blocks, obscure audit denials, and boot loops.
For many desktop power-users, keeping SELinux disabled or permissive remains the pragmatic choice to avoid constant administrative overhead. However, if compliance or system configuration requires you to switch back to Enforcing mode, you can execute this via terminal or via the graphical interface (GUI).
How to Disable SELinux in Fedora, RHEL, and CentOS
While SELinux provides powerful security controls for production servers, it frequently causes friction, permission blocks, and administrative overhead on developer workstations and desktop environments. If you want to completely turn off SELinux and set it to the Disabled state, you can accomplish this easily using terminal commands.
Here is the step-by-step guide to switching SELinux from Enforcing (or Permissive) to Disabled.
Step 1: Open the SELinux Configuration File
To permanently change the SELinux state, you need to edit its main system configuration file. Open your terminal and run the editor command corresponding to your Linux distribution:
For Fedora:
Bash
sudo dnf install gedit
sudo gedit /etc/selinux/config
For RHEL, CentOS:
Bash
sudo yum install gedit
sudo gedit /etc/selinux/config
(Note: You can substitute nano or vim for gedit if you prefer a command-line text editor).
The SELinux configuration file will open in your editor, displaying parameters like SELINUX=enforcing and SELINUXTYPE=targeted.
Step 2: Update the Mode Parameter to Disabled
In the editor window, locate the active mode line and change it from enforcing (or permissive) to disabled:
Plaintext
SELINUX=disabled
Save the modified configuration file and exit the editor.
Step 3: Restart Your System
Because SELinux operates at the Linux kernel level, changes to the core configuration file require a full system reboot to take effect across all services and processes.
Run the reboot command in your terminal:
Bash
sudo reboot
Step 4: Verify the Disabled State
Once your system boots back up, open the terminal and verify that SELinux has been successfully turned off:
Bash
sestatus
The output should confirm that the SELinux status is disabled.
Set SELinux from Disabled to Permissive/Enforcing (Terminal)
Step 1: Switch to Permissive First
We cannot change the SELinux mode directly from Disabled to Enforcing. All files present in the system must be re-labeled by SELinux first; otherwise, the Linux operating system will not be able to access those files properly.
Therefore, we first change the SELinux mode to permissive.
Run these commands in the terminal to open the configuration file:
For Fedora: `szsh sudo dnf install gedit sudo gedit /etc/selinux/config
**For RHEL, CentOS:**
```bash
sudo yum install gedit
sudo gedit /etc/selinux/config
In the editor, change "SELINUX=disabled" to "SELINUX=permissive".
Step 2: Save and Restart for Relabeling
Save your changes and restart your computer. After restarting, SELinux will re-label all the files in the system. This process takes anywhere from 2 to 20 minutes depending on the size of your data and the speed of your hard drive.
⚠️ Important: Do NOT restart or interrupt your computer until this relabeling process is completely finished!
Step 3: Boot into Permissive Mode
When your system boots up, your SELinux mode will be successfully set to permissive.
Step 4: Promote Permissive to Enforcing
Now, we can finally change the SELinux mode to Enforcing. (Skip this step if you want the SELinux mode to remain at permissive mode).
Run these commands in the terminal:
For Fedora:
Bash
sudo dnf install gedit
sudo gedit /etc/selinux/config
For RHEL, CentOS:
Bash
sudo yum install gedit
sudo gedit /etc/selinux/config
In the editor that opens, change "SELINUX=permissive" to "SELINUX=enforcing".
Now, save the file and restart your PC:
Bash
sudo reboot
After this final restart, your SELinux will be fully active in enforcing mode.
Set SELinux from Permissive to Enforcing (Terminal)
Step 1: Open the Configuration File
Run these commands in your terminal to open the SELinux configuration file in an editor:
For Fedora:
Bash
sudo dnf install gedit
sudo gedit /etc/selinux/config
For RHEL, CentOS:
Bash
sudo yum install gedit
sudo gedit /etc/selinux/config
The SELinux config file will open up in the editor.
Step 2: Update the Mode Parameter
In the editor, locate the parameter and change "SELINUX=permissive" to "SELINUX=enforcing".
After editing the file, save it and restart your system:
Bash
sudo reboot
After the restart, your SELinux will be set to the enforcing mode.
How to Approve and Handle SELinux Blocks via GUI (No Tech Knowledge Required)
If you truly want to keep SELinux enabled in Enforcing mode on your desktop system, handling blocks requires zero technical knowledge of security policies if you use Fedora’s built-in graphical troubleshooting suite (setroubleshoot).
When a system process or application attempts an action that violates security rules, SELinux blocks it and opens a graphical alert window. The tool translates these low-level security denials into plain language and provides explicit commands you can copy and paste directly into your shell to approve the action.
Example 1: Handling a Plugin Scan Block (gst-plugin-scan)
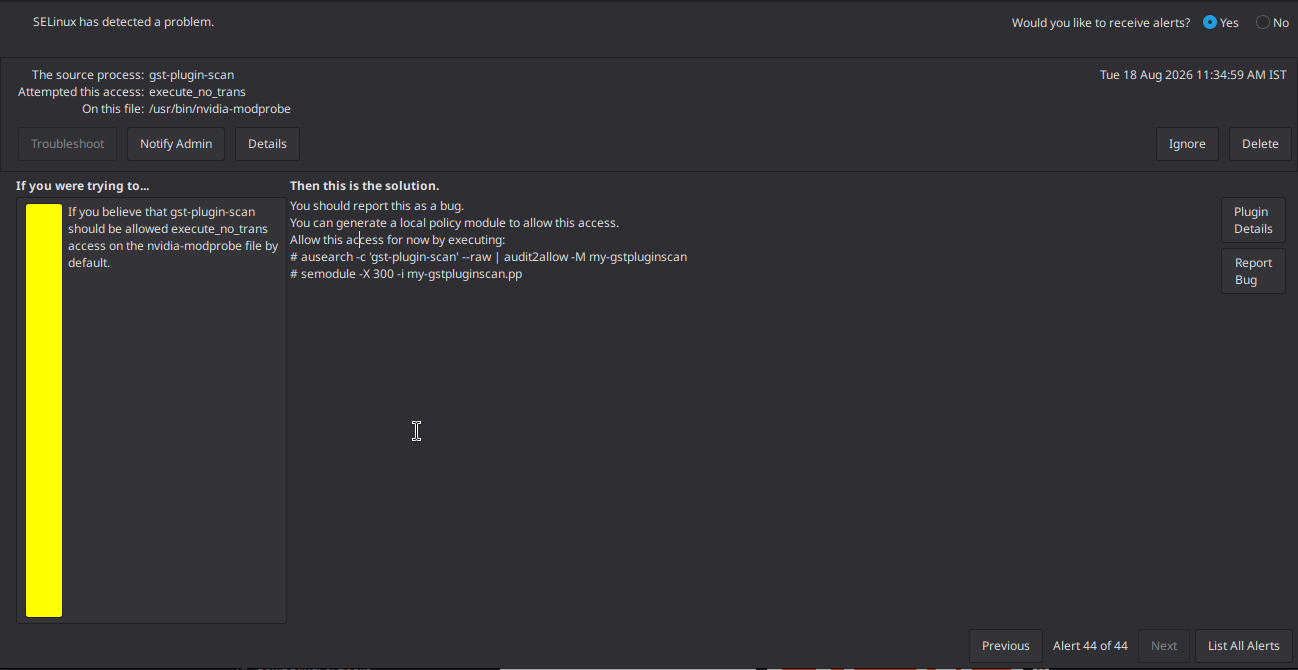
When background utilities like gst-plugin-scan are restricted from accessing system binaries (such as running execute_no_trans on /usr/bin/nvidia-modprobe), the graphical alert interface displays the exact block details:
Reading the Prompt:
- The source process:
gst-plugin-scan - Attempted this access:
execute_no_trans - On this file:
/usr/bin/nvidia-modprobe - If you were trying to…: “If you believe that
gst-plugin-scanshould be allowedexecute_no_transaccess on thenvidia-modprobefile by default.” - Then this is the solution: “You should report this as a bug. You can generate a local policy module to allow this access. Allow this access for now by executing:”
How to Approve via Shell:
Simply copy the provided commands from the graphical prompt and paste them into your terminal shell to generate and install the local policy override:
Bash
# ausearch -c 'gst-plugin-scan' --raw | audit2allow -M my-gstpluginscan
# semodule -X 300 -i my-gstpluginscan.pp
Example 2: Handling a Firewall Service Block (firewalld)
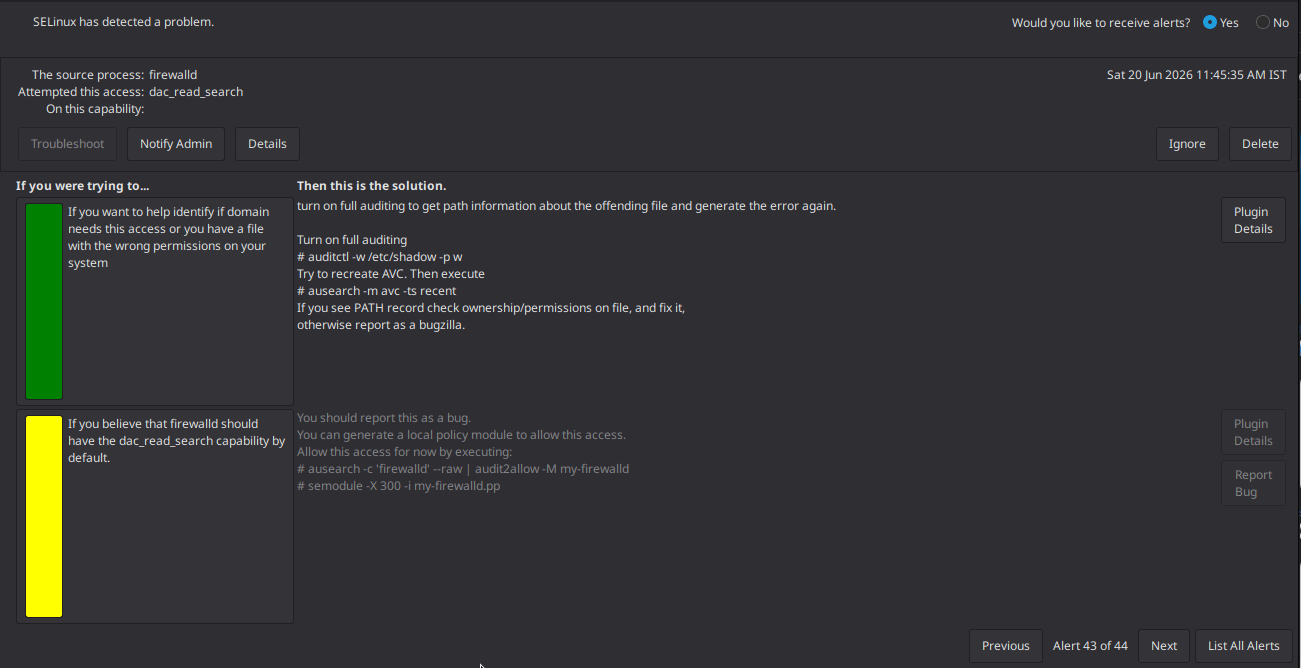
Similarly, when core system services like firewalld attempt elevated read searches (dac_read_search), the troubleshooter logs the event and offers targeted solutions:
Reading the Prompt:
- The source process:
firewalld - Attempted this access:
dac_read_search - If you were trying to… / Solution: The interface provides diagnostic steps to verify file ownership or generate a custom policy module if you believe the service requires the capability.
How to Approve via Shell:
If you want to whitelist the blocked access based on the tool’s recommendation, execute the generated policy commands in your terminal:
Bash
# ausearch -c 'firewalld' --raw | audit2allow -M my-firewalld
# semodule -X 300 -i my-firewalld.pp
Summary of GUI Controls
- Navigation: Use the Previous, Next, and List All Alerts buttons at the bottom right to cycle through multiple security notifications.
- Management: Use Ignore or Delete on the top right to clear specific alerts, or toggle real-time alerts on/off using the
Would you like to receive alerts?radio buttons.